Wednesday, February 29, 2012

Sigma Brushes - Update

This is just a little update on what's happening over at Sigma Beauty, Sigma has been hard at work updating their line of brushes etc. Their best selling Professional brush kit with it's 15 brushes now comes in a 'delux carrying case' rather than the brush roll it used to come in. This was something that was requested by many people when Sigma brought out their 'Extravaganza' range before Christmas ... thanks Sigma :)


This brush kit sells for $149.00 (including the case)
Kit holds 15 brushes securely
Smart looking new case :)
Another item Sigma has added to recently is their Cleansing and Polishing tool, originally it came with three different brush attachments, soft, medium and hard for exfoliating and polishing your skin. You can now buy three more attachments to compliment the kit that are designed to 'create the ultimate spa experience'. There is an extra soft brush, massager and a pumice stone which is great for your rough spots :) The full new kit is call 'Spa Solutions'.


Three new attachments


Complete Spa Solutions Kit
The full kit sells for $59.00

Wednesday, February 22, 2012

Butterfly Wall Art - DIY How To

I love my butterfly wall, it's dreamy and fun and adds that little something to an otherwise normal room I guess. It was also really really easy to do.


For Christmas I was given an iron wall art piece from Target, it was pretty but I couldn't figure out a way to make it work by itself, it just needed something extra? I tried handing it different ways but it still didn't look 'great'. Then the idea of butterflies came, inspired by a photo on the net from Gossip Girl (no, I don't watch this show) I really liked the look and feel of it although that one is done in metal and designed by the Artist 'Paul Villinski', I wasn't going to go cutting beer cans open in the name of my wall art, hehehe I wanted mine to look different as well because I wanted to incorporate the iron flower wall art.

So, by hanging the iron wall art from the top corner of my wall (thanks dad!! :)) I could work out a way to do the butterflies, I already had my fairy lights hanging so using this as a bit of a guide helped with the direction of the butterflies. I roughly sketched a quick design on paper and then found a butterfly outline I liked online (just google butterfly templates). By copy and pasting the butterfly into a word document I could re-size it how I wanted. My aim was to have three different sized butterflies with the biggest being no more than 10cm across.

Once I had my butterflies printed out and cut out then came the job of cutting them out of cardboard, depending how many '3D' butterflies you want, start with 5 of each size (you can always cut more later). I chose a very dark purple cardboard (like my curtains) and a patterened creamy/brown cardboard (it was double sided) and black cardboard for them. My sister Jessica helped with the cutting out, you will have to trace the different sized butterflies onto the cardboard sheets. My cardboard came from my mum's craft stash but you can get it from any scrapbooking shop, you will need the heavy card, not the large poster card.

cut out butterflies
Ok, butterflies all cut out :) Grab one of your butterflies and a lead pencil and, with your rough sketch close by, start tracing around the butterflies. REMEMBER the more random you place them the better they will look, butterflies are never flying around in an even group, they are always 'scattered' so resist the urge to space them evenly hehehehe every so often take a few steps back and have a look at your design, it looks nice to have a few overlapped occasionally. It's a good idea to have more butterflies at the centre (focal point) of your design and then less butterflies as they fly away, almost like they are 'taking off'. Be sure to mix up the sizes of your butterflies too.

rough sketch

draw butterfly on wall using cutout as a template


After you've traced all your butterflies, and you're happy with your design, it's time to paint. I chose black craft paint because my iron wall art was black, any colour will work it's up to you. It's a good idea to start at the upper left of your whole design if you are right handed and if you are left handed you should start at the upper right corner. This will prevent you dragging your arm over the wet butterflies as you work :) With a small paint brush, paint the edge of the butterfly first and then fill it in, this may look a little rough to start with but don't worry, you will be giving it a second coat of paint so you can fix up any little bits then.  Once the first coat is dry, go over all the butterflies again.

a small paint brush


carefully paint edges first


fill in first coat of paint

once dry, add second coat of paint


Remember, if the weather is really hot the paint will dry quickly, even on your brush!!! hahaha Be sure the paint is not too runny because you don't want your butterflies 'running' :(

Butterflies all dry? Now it's time to add some dimension, this step is completely up to you, you may want to leave it with just the painted butterflies but because I had the iron wall art I wanted some balance.

With a good double sided tape cut very thin to fit on the body of the butterfly, randomly place your cardboard butterflies throughout your art work, keep stepping back to have a look and when you're happy, STOP!!! You don't have to use them all :) Keep the left over butterflies and tape in a safe place so you can use them at a later date if you want to.

strong double sided tape

cut tape to fit back of butterfly's body, bend butterfly


store left overs safely :)


I hope this 'how to' was of some help and I hope your art work turns out beautifully!!!


See my Room Tour video HERE and more photos HERE

Monday, February 20, 2012

Goodnight Macaroon - Online Store/Fashion Review

This year I’m really starting to take more of an interest in fashion and styling so when I was asked to try out some clothes from ‘Goodnight Macaroon’ I was pretty excited :)

Crochet/Lace Shorts and Top from Goodnight Macaroon
‘Goodnight Macaroon’ is a fairly new ‘E-Boutique’ that is inspired by celebrity, blogger and street fashion trends. They cater for the budget conscious through to the seasoned spender and have a fairly regular turnover of new clothes.

What did I get?

I was able to choose some garments of my liking from the store which was quite easy to navigate.

Sweetheart Dress – I chose this dress in lilac and in a small size and can honestly say it is exactly as the online picture shows it. It’s very soft and flowing  and is a nice fit. The only problem I had with this dress is that the shoulder straps were too long for me but that can happen when you purchase clothes that come in small, medium and large. It’s no big deal to take the straps up a little. All the seams were finished properly and met up and the gathering was even, the buttons were all fixed on securely.

This dress comes with a detachable collar piece which is a cute addition but I think I would have preferred it to be attached on the inside of the dress rather than the outside. I love the colour and think this dress is very pretty and easy to wear  :)


Crochet Lace Shorts (high waisted) – I’ve seen these in pictures and was curious about them so thought they would be a fun addition to my wardrobe, I chose black because I’m just not too good with white bottoms, haha :D When I first put them on I wasn’t too sure if I liked them that much :/ but after about half hour wearing them I really liked them, it’s good to try new looks out :D I like how you can dress these shorts up with heels and not look ‘trampy’ and that they look just as good styled casually with flats! :)

Again, the shorts were true to the photo on the site, they fit nicely and would also fit the sizes stated in the description which is sizes 6 to 12 (although I think a 12 would be a tight fit). The seams were finished properly and straight and the elastic waist was made well.

Silky Satin Oversized Tee – I was pretty pleased with this when it arrived because I was half expecting to find loose threads and crooked seams because of the type of fabric it’s made from but apart from a slightly crooked overlocking seam on the inside (which does not affect the outside at all) it was really well finished. The colour on the site said ‘white’ but to me it is more a ‘winter white/cream’ colour. This top is made to be big and is a ‘one size’ garment but honestly I don’t think you would get the same effect on a size 12 figure as you would on a smaller size, I think it may hug a little too much at the hip. I will probably wear this top a lot because it will go with so many other things in my wardrobe, it’s loose and comfy and will dress up a pair of jeans instantly :)

Goognight Macaroon seems to cater more for sizes 6 – 12, you should always check the size charts when shopping online and don’t just presume that sizes will be the same for every country, if you still don’t know if something will fit you then contact the store and ask. The customer service was friendly and helpful and the postage took about a week and is $7.99 for regular post to Australia and $35 for express.


* I have noticed on their site that they are advertising FREE SHIPPING WORLDWIDE so maybe check this out if you place an order :)

There have been a few changes to the store over the past few months which make it more attractive and easier to look around so I think with time there will be more features and a greater selection of clothes to choose from.

You can see how I styled the shorts and top in my Video HERE and visit Goodnight Macaroon HERE :)


Goodnight Macaroon are offering 10% off discount code : Enter "CM10" at check out to redeem the discount

Skin 79 – mybbcream.com – Korean Cosmetics Review


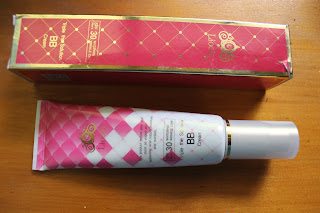
I’ve had the Skin79 Hot Pink Super Plus BB Cream Triple Function for quite some time now and really love using it so when I was asked by mybbcream.com if I would like to try out a couple more products from the Skin79 range I was very willing.

Photo property of Public Domain

What is BB Cream?

‘BB stands for "Blemish Balm" and originated from Germany where dermatologists initially used it to help laser surgery patients protect, soothe and regenerate their highly sensitive skin while also providing good coverage for post-laser scars and redness.’   ... extract

With pale flawless skin being such an asset in Asian countries, Korean Actresses found this miracle worker to their liking after having surgery and starting using it on a regular basis. Cosmetic companies took notice and started producing BBCreams for the general public. The public versions are aimed at those with sensitive and acne prone skin, giving coverage to dark blemishes and protection from the sun. You are getting both skincare and makeup in one.

A great reference when trying to choose the right BBCream for your skin type can be found here - http://www.mybbcream.com.au/index.php?route=common/qa02
Just follow the 2 simple steps.

The way to apply BB Cream is after you have cleansed and moisturized your face, apply the bb cream and then allow to sit for a bit, apply a little extra to the areas that might need more coverage. BB Cream will oxidize within about half an hour and take on the look of your own skin tone. In hotter weather you may get some shininess like you do with any other foundation but nothing a little blotting or powder can’t fix.

Skin79

See my review on the Hot Pink BBCream HERE

Mini BB Cream Travel Set

This set is a great way to sample BB Creams and also for those that are travelling and don’t want to take too much with them. This set contains 4 x 5 ml tubes of BB Cream in –

Hot Pink Super Plus BB Triple Function
VIP Gold Super Plus BB Triple Function
Diamond the Prestige
Diamond Luminous Pearl

Mini Travel Set $18.00
Diamond II All Day Sun Powder SPF 30

This product is very prettily packaged in a clear container with metallic pink lid and powder applicator fitted in the top, there is also a sifter to help control powder distribution. The sponge applicator is great for applying the powder to your face but I also use a brush to finish the job.

The powder appears to have a very slight pink colour and shimmer and it’s said to contain ‘Diamond Powder’ and ‘Blooming Jewel Complex’ with 5 jewels which help to make the skin luxurious, shiny and luminous.

I have been using this powder after applying all my makeup to ‘set it’. The powder is not too heavy and only has the slightest shimmer to it. It has added sun protection so that’s a plus, is whitening and anti-wrinkle :)

Although very pretty on top of my makeup trolley, it’s not something that I can carry around in my handbag.

Would I recommend this product, yes I would, especially to those who enjoy using BB Creams.

All Day Powder $32.00
Orange Super Plus Triple Functions BB Vital Cream

This is the newest addition to the Skin79 range, apparently it’s ‘upgraded’ with the addition of a higher sun and all round weather protection and added vitamins. This ‘Hot Orange’ bb cream has an SPF 50!!

I’ve been using it over the past week or so and have found no real difference from the ‘Hot Pink’ one apart from it does look a lot paler on my skin. It works well and I haven’t broken out more than usual but I personally prefer the ‘Hot Pink’ probably because I am a little tanned right now and want my face to blend better with the rest of my upper body area hehe but if you are wanting that 'pale porcelain skin' look then this is a good choice :)

The packaging is the same as the ‘Hot Pink’ but obviously ‘Hot Orange’ which is something I really like, I almost expect to smell citrus whenever I use it, hahaha. Because of the packaging I find there is little to no wastage and it just looks cool :D

Orange Super Plus $45.00


MyBBCream Korean Cosmetics

My BB Cream is an Australian based online Korean Cosmetics store that of course specialises in selling BB Creams and associated products.  They have a large selection of brands to choose from including skincare and some makeup. The service is professional and reliable. MyBBCream only ship online orders within Australia with a flat rate of $8.00 and there is free shipping with orders over $50.00 (Australia only)


From my personal experience, I have found other sites that sell BBCreams at a cheaper price than My BB Cream but that being said, they do not have as large a selection of BB Cream products and fast delivery within Australia. 'MyBBCream' have two Sydney Stores and one in Melbourne for that 'hands on' try before you buy experience :)

Where can you buy BB Creams - Price Comparison

My BB Cream – Hot Pink Super Plus BB Cream  - $ 39.00 - HERE + $8.00 post (1-2 days delivery)
Hikosen Cara – Hot Pink Super Plus BB Cream - $22.04 - HERE + $3.42 post (7-10 days delivery)
YesStyle – Hot Pink Super Plus BB Cream - $20.52 - HERE + $9.99 (7-10 days delivery)

Sunday, February 19, 2012

Likes and Dislikes ...

What I’m loving right now ...

I haven’t done one of these for a long time and because I’m not really someone who does ‘monthly favs’ regularly I thought I would blog my loves that I’m loving right now :D

First up would have to be my boyfriend hehehe ..... nuff said :D

I’m loving my new room and the freedom that comes with not having to share with someone else, I feel slightly more grown up and a little more creative in my own space.

My room at night  :D 

BB creams are one thing I’m really enjoying right now, I’ve been trying out a couple of new ones and am quite happy with the results. 


Fashion is also higher on my list at the moment, I’ve taken a new interest in styling and fashion in general so you may be seeing more videos on that :) 


together with photography, you all know I bought the Canon T31100 in December and I’m enjoying getting to know it better, but I’ve just ordered myself a new Instant camera to play with, I can’t wait for it to arrive <3 I think it’ll be so cool to have an instant camera :D cos you know ..... I’m so cool and all :P hehehe

The Aussie Sample boxes were lots of fun this month, out of the four on offer I think I liked the ‘Glossybox’ and ‘ILoveThisBox’ the most, not just because they put lots of effort into the Valentine theme but the samples were pretty darn good this month :)


February Special Edition Glossy Box


February ILovethisBox


What I’m not liking much atm ...

My hair, it’s bleached at the hairline from the sun and I haven’t dyed it since October :( I was trying to leave it to go natural until about June and then do something with it but I don’t think I can !! I’d like to get a really good cut and colour it something different to what I normally do, maybe I’ll go lighter this time around :)

I’m also over the hot and steamy, heat and humidity of Summer, I won’t to feel fresh, clean and dry again, hahaha roll on Autumn :D

Saturday, February 11, 2012

Hikosen Cara, Korean Makeup Review

I've always admired the lovely packaging of the Asian beauty products I've seen used so when I was given the opportunity to try some products from 'Hikosen Cara' I eagerly accepted :D :D


Hikosen Cara is a New Zealand based Korean online store that sells the cutest products, they don't just have cosmetics, but also the cutest cushions, backpacks and slippers :)


The products I received were as follows


Lioele Triple the Solution BB Cream SPF 30 


I really like the feel of this BB Cream, it applies nicely and settles well on the skin, the colour is a great match for me and the coverage can be built to suit the individual. The packaging is great, pretty pink with gold touches. The only drawback to this product is the smell, I really do not like the smell which is a bit 'chemical' for me :( but other than that I do like the product.


FacePowder – Peripera ‘I Love Pact’ SPF40 – Shade 21


Not only is this product really pretty to look at with it's silver silver and black compact with rose coloured embossed pattern on top,  but it definitely is a great face powder. The compact contains a nice sized mirror and sponge applicator and the product comes with a refill which I absolutely love, what a great idea :)  The powder applies well and stays on for quite a long time. The colour I chose was well suited to me. I have no dislikes about this product.


Peripera Smile Fit Blusher – Shade 2 ‘Vanilla Pink’


Very nicely packaged with metallic rose lid embossed with white lace design and black base. This blusher appears to be quite pale but once applied it is simply beautiful, the brush that is in the compact is actually a wonderful quality which surprised me because you don't normally get that. I love this blush :)


Peripera Lip Makeup My Colour Lips - No. 13 'Mandarin Orange'


Haha how pretty is this lipstick!!! With it's pink clear lid that is embossed with a lace design and the metallic base that seems to have a 'pedestal' it is very over the top 'pretty' and the lid itself has a good 'snap' shut sound and feel :)  The lipstick is very creamy and of a great quality but unfortunately I think I chose the wrong colour for me so unless I mix it with another lip product I won't really get to use this a lot. 


The online store itself has a nice variety of products, it's not huge but they haven't been around for that long. It's based in New Zealand which is great for New Zealanders but unfortunately, although it's close for us Australians, the currency conversion doesn't always work in our favour which is a downside to ordering online because you also have to include the postage costs, so be aware.


The customer service was very nice and the ordering process was very easy to understand and navigate. 


Check out my video using these products HERE :)


Valentines Picnic in the Park - on a budget

This is the first year I have been in a relationship at Valentine's Day and I am super excited about it :) However, over the years my friends and I have always been each other's Valentines in a fun way and I didn't want to loose this tradition, so I decided to hold a little picnic in the park for us girls to enjoy :)


If you're looking for something to do this Valentines and are not sure what, why not have a picnic with your friends!! If you live in a cold climate and you can’t get outside, make it a tea party instead :) Throw some quilts on the floor and set the table just like on a picnic :)

It doesn’t take much to put something like this together, all you need is a handful of friends, some fun food and a bit of creativity.

Theme

Haha, well the theme of course was 'Valentines' but I wanted a bit of a mix for my look, it was to be pretty but not ‘old’ pretty, more a fun thrown together kind of look.  I went off to the Op-Shop/Thrift Shop and found some napkins, a bed sheet, an odd cushion and some flowers.

What I used

Lemon coloured bed sheet – thrifted $3.50
Pink and Lemon coloured napkins (damask) - .20c each x 8 - $1.60
Cushion - $2.00 plus some I already had
Blue Glass Water Bottle - $1.99 – Woolworths
Assorted china and glass plates – mum’s
Red check fabric – mum’s
Tablecloth – mum’s
Green Plastic plates for food – Woolworths $1.99
Glass bowls for food – mum’s
Flowers (artificial) – thrifted - $3.50
Lanterns (birthday gift) – hung by wrapping twine – already had
Throw quilts – mum’s
Bubble blowers - $1.00 each x 2 - $2.00 plus some I already had from my 18th
Old picnic basket – mum’s
Old net curtain – mum’s


Food

I asked everyone to bring something ‘pretty’ to eat (no chip bags, hahahaha)
I bought watermelon
Mini Macaroons
Cupcakes
Mini Marshmellows
Bottled drinks

Invites

I invited my friends over Facebook because it was really short notice, a nicer way would be to email designed invites or actually send paper ones!!!! :O haha

Location


We went to a local Park and found a ‘cabana’ over the water, the centre was covered so that if it rained we would be pretty safe. I threw quilts on the ground and some cushions and laid fabric etc on the wooden benches to use like a table. I hung lanterns in one opening of the cabana and the curtain in another opening. Fake flowers were thrown in various places and a scarf hung near the food to add a bit of interest.

*******************


The picnic started around 10.00am and went for a couple of hours and it was a really nice way to spend time with my friends and a great way to celebrate Valentines Day. We had it a few days before Valentines so that those with partners could still have the actual ‘day’ with them.

The picnic was fun to do and everyone seemed to enjoy it :)

I hope you enjoyed this quick post and that it inspires you to do something with your friends :)


LinkWithin

Related Posts Plugin for WordPress, Blogger...